Adding a gallery
Posted on July 24, 2023 (Last modified on August 17, 2023) • 15 min read • 3,169 wordsAdd a gallery to Hinode.
Introduction
One thing that the Hinode theme does not have is a gallery. There are loads of galleries to choose from, also usuable with Hugo, but I wanted something that kept within the theme of the site. As a result, I settled on creating the gallery myself and using Lightbox 2 as a way to view the individual pictures in the gallery.
The mgallery shortcode offers the following features:
- Display the gallery in a grid mode or a masonry mode.
- Define a whitespace between the images in a gallery, ranging from none to very large.
- Create thumbnails that have the original ratio, or a ratio of 1x1, 3x2, 4x3, 16x9 or 21x9, without deforming the image.
- Define a variable number of columns, ranging from 2 to 5.
- Add an optional overlay to the image, in the center or in one of the four corners of the image (not for the thumbnails).
- Let the gallery fit in the look and feel of the site.
- Get the image caption and credits from a file or the image Exif information.
Details on how to install and use the mgallery shortcode, can be found in the
documentation.
Displaying the gallery
There are several ways to display a gallery, the two most common ones are to display the thumbnails in a grid and as a masonry.
In this implementation of the mgallery shortcode, showing thumbnails in a grid means that all images are organized in equally sized columns and all images on a row will have the same sized grid, as shown in the image below.
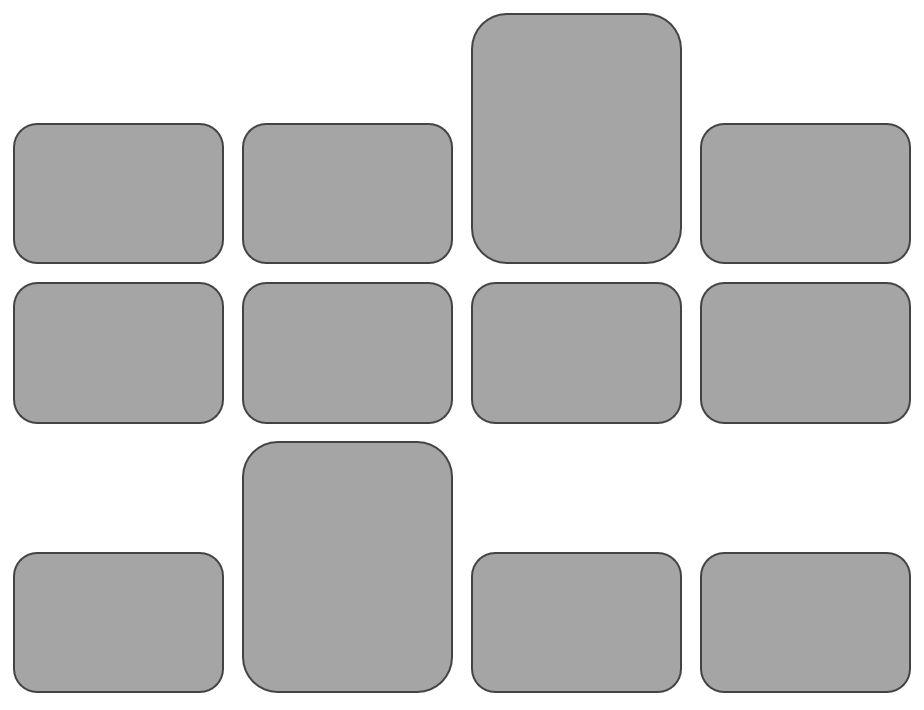
The width of each grid element is always the same and is determined by the number of columns the gallery has. Because of that each of the image thumbnails is scaled to fit that width. The height of the grid elements on a row is based on the tallest image on that row. When there are horizontal and vertical images on a row, the result is a blank area in the grid elements that have a horizontal image.
A mason is a person who lays bricks. To prevent a wall to have holes, the bricks are fitted in such a ways that no holes will appear. The same is true for a masonry gallery. The images are fitted in such a way that there are no empty spaces. The mgallery shortcode supports a masonry as shown in the below image.
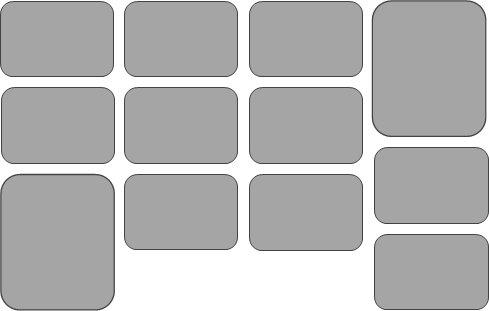
The width of each masonry element is always the same and is determined by the number of columns the gallery has. Because of that each of the image thumbnails is scaled to fit that width. There is no alignment of images in the vertical direction. In the vertical direction images are ‘fitted’ to the image above, so that the distance between images is always the same.
If all images in a gallery have the same size, there is no visual difference between a grid and a masonry. At least not on a larger screen. On a smaller screen the number of columns will be reduced in a grid to try and keep the image size somewhat the same. In a masonry, the entire masonry is resized, making the masonry look the same, but with smaller images on a smaller screen.
Code explanation
See the
installation section of the mgallery documentation for information on where to find the mgallery shortcode source file.
Loading the images
The source code of the shortcode starts with a check of all the parameters (see also
this page for all the parameters).
One of these parameters is list, which specifies which images should be displayed. This is the code that takes care of loading the set of images.
 1<!-- Get list of images to process -->
 2{{- $list := false -}}
 3{{- with .Get "list" -}}{{- $list = true -}}{{- end -}}
 4<!-- Get all images in the folder and sub-folders where the file is located -->
 5{{- $image := (.Page.Resources.ByType "image") -}}
 6{{- if .Page.BundleType -}}
 7    {{- if $list -}}
 8        <!-- Get all files that match the blob specified -->
 9        {{- $image = .Page.Resources.Match (.Get "list") -}}
10        <!-- Filter the result to have images only -->
11        {{- $image = $image.ByType "image" -}}
12    {{- end -}}
13{{- else -}}
14    <!-- Not a bundle type. Do we have a headless folder? -->
15    {{- $headless := .Page.GetPage "headless" -}}
16    {{- if $headless -}}
17        {{- if $list -}}
18            <!-- Get all files that match the blob specified -->
19            {{- $image = $headless.Resources.Match (.Get "list") -}}
20            <!-- Filter the result to have images only -->
21            {{- $image = $image.ByType "image" -}}
22        {{- else -}}
23            {{- $image = $headless.Resources.ByType "image" -}}
24        {{- end -}}
25    {{- end -}}
26{{- end -}}
If the shortcode is used in a page bundle file, (index.md or _index.md), the check for .Page.BundleType in line 6 will be true. It will be false when the shortcode is used on any other page.
The default state for the list parameter is that all images in the bundle resource will be used, this is what happens in line 5. When the page is a page bundle and the list parameter is defined a search for the files that match the blob as specified in list will be performed (line 9) and following that filtered to remove all files that are not images (line 11).
When the page where the shortcode is used is not a page bundle, the code will go to line 15 to check if there is a headless page bundle defined.
In this case this is true when there is a folder headless in the same folder as where the page with the shortcode is located, and in that headless folder there is an index.md file with the following frontmatter:
---
headless: true
---
If this cannot be found, no images will be found either. If it is present and the list parameter of the shortcode is not used. All image resources of the headless page bundle will be used (line 23). If a blob is defined in the list parameter, a search for the files that match the blob as specified in list will be performed (line 19) and following that filtered to remove all files that are not images (line 21).
Creating thumbnails
The code fragment for creating the thumbnails is as follows:
 1{{- $thumbName := printf "%s/%s_t%s%s" (path.Dir .RelPermalink) (path.BaseName .RelPermalink) $thumb (path.Ext .RelPermalink) -}}
 2<!-- Set height and width for resizing -->
 3{{- $ratioClass := "" -}}
 4<!-- Calculate the width based on the minimum of the image size and (window size)/cols -->
 5{{- $width := int (math.Min .Width (div $windowSize $cols)) -}}
 6<!-- Calculate the height and if needed, correct the width -->
 7{{- $height := 0 -}}
 8{{- if strings.Contains $thumb "regular" -}}
 9    {{- $height = int (div (mul $width .Height) .Width) }}
10{{- else -}}
11    <!-- Determine the height based on the width and the ratio -->
12    {{- if strings.Contains $thumb "1x1" -}}
13        {{- $height = $width -}}
14        <!-- Correct width if height is larger than the image height -->
15        {{- if gt $height .Height -}}
16            {{- $height = .Height -}}
17            {{- $width = $height -}}
18        {{- end -}}
19        {{- $ratioClass = "ratio ratio-1x1" -}}
20    {{- else if strings.Contains $thumb "3x2" -}}
21        {{- $height = int (div (mul $width 2) 3) -}}
22        <!-- Correct width if height is larger than the image height -->
23        {{- if gt $height .Height -}}
24            {{- $height = .Height -}}
25            {{- $width = int (div (mul $height 3) 2) -}}
26        {{- end -}}
27        {{- $ratioClass = "ratio ratio-3x2" -}}
28    {{- else if strings.Contains $thumb "4x3" -}}
29        {{- $height = int (div (mul $width 3) 4) -}}
30        <!-- Correct width if height is larger than the image height -->
31        {{- if gt $height .Height -}}
32            {{- $height = .Height -}}
33            {{- $width = int (div (mul $height 4) 3) -}}
34        {{- end -}}
35        {{- $ratioClass = "ratio ratio-4x3" -}}
36    {{- else if strings.Contains $thumb "16x9" -}}
37        {{- $height = int (div (mul $width 9) 16) -}}
38        {{- if gt $height .Height -}}
39            {{- $height = .Height -}}
40            {{- $width = int (div (mul $height 16) 9) -}}
41        {{- end -}}
42        {{- $ratioClass = "ratio ratio-16x9" -}}
43    {{- else if strings.Contains $thumb "21x9" -}}
44        {{- $height = int (div (mul $width 9) 21) -}}
45        {{- if gt $height .Height -}}
46            {{- $height = .Height -}}
47            {{- $width = int (div (mul $height 21) 9) -}}
48        {{- end -}}
49        {{- $ratioClass = "ratio ratio-21x9" -}}
50    {{- end -}}
51{{- end -}}
52<!-- Resize and crop -->
53{{- $resized := .Fill (printf "%dx%d q80 CatMullRom" $width $height) | resources.Copy $thumbName -}}
In line 1 the name of the thumbnail is generated, in order to create a user-friendly name for that thumbnail. It will be the basename of the image, postfixed with _t and the ratio value of the thumb parameter. It could be something like img/animage_t21x9.jpg
In line 5, the maximum width of the thumbnail is calculated. which is the window size (872 pixels) divided by the number of columns. Based on that width, the height of the thumbnail is calculated, based on the thumb parameter, in lines 12-50. In, the somewhat rare case, that the calculated height, happens to be larger than the image height, the height is made equal to the image Height and the width is recalculated.
Finally in line 53, the actual creation of the thumbnail happens. The resulting thumbnail will have the specified size, without deformation. The .Fill operation will use cropping and resizing to reach the specified size.
Caption and credits
The caption and credits for each of the images are derived either from a file or from the Exif information of the image.
 1{{- $caption := "" -}}On line
 2{{- $credits := "" -}}
 3{{- $textPath := printf "%s/%s.txt" (path.Dir .RelPermalink) (path.BaseName .RelPermalink) -}}
 4{{ if os.FileExists $textPath -}}
 5    <!-- read the file -->
 6    {{- $reading := split (os.ReadFile $textPath) "|" -}}
 7    {{- range $index, $value := $reading -}}
 8        {{- if and (not $caption) (eq $index 0) -}}
 9            {{ $caption = $value }}
10        {{- end -}}
11        {{- if and (not $credits) (eq $index 1) -}}
12            {{ $credits = $value }}
13        {{- end -}}
14    {{- end -}}
15{{- end -}}
16{{- with .Exif -}}
17    {{- if not $caption -}}
18        {{- $caption = .Tags.ImageDescription -}}
19    {{- end -}}
20    {{- if not $credits -}}
21        {{- $credits = strings.Title (lower .Tags.Artist) -}}
22    {{- end -}}
23{{- end -}}
Line 3 builds the name of the text file that has the caption and/or credits for the current image. The name of the file is the same as the name of the image being processed, but with the extension .txt. Following that a check is performed if the file exists and if so, it will read the file.
The format of the file is expected to be as follows:
This part is the caption|and this is the creditsThe part before the | character is the caption and the part following the | character is the credits. If there is no | character, everything is processed as the caption. When there are only credits, the contents of the file should start with the | character, followed by the credits. Any text after a second | character will be discarded. This is realized in lines 6-14.
When the caption or credits have not been found yet, an attempt is made to read it from the Exif information that is normally stored in the image file. This takes place in lines 16-23. In line 21, each first letter in the caption is capitalized. The reason for this is that some camera’s store the photographer’s name in all caps.
Adding an overlay image
An overlay image can be added to the image. There are a few parameters that are used to determine in what way the overlay is to be added to the image. These parameters are:
| Parameter | Description |
|---|---|
| overlay | Optional name of an overlay image located in the assets folder that is added to all the images in the gallery (not the thumbnails). This can e.g. be used as a watermark. If empty, no overlay is shown. |
| ovlpos | Optional position of the overlay image, which can be: “left-top”, “right-top”, “left-bottom”, “right-bottom” (default), “center”. |
| ovlx | Optional offset in pixels for the x direction of the overlay image in pixels. Will shift the image away from the corner. Not used for ‘center’. Defaults to 0. |
| ovly | Optional offset in pixels for the y direction of the overlay image in pixels. Will shift the image away from the corner. Not used for ‘center’. Defaults to 0. |
| ovlperc | Optional percentage for the size of the logo related to the size of the image. By default the logo is not resized. |
 1{{ if $useOverlay -}}
 2    <!-- Apply scaling of overlay when applicable -->
 3    {{ if ne $ovlperc 0 -}}
 4        <!-- Scaling of overlay -->
 5        <!-- Calculate new size of the overlay image -->
 6        {{ $useSize := math.Min .Width .Height -}}
 7        {{ $newSize := int (div (mul $useSize $ovlperc) 100) -}}
 8        <!-- Resize the overlay, but use a proper quality method -->
 9        {{ $overlay = $overlay.Resize (printf "%dx q80 CatMullRom" $newSize) -}}
10    {{ end -}}
11
12    <!-- Determine offset of the overlay image -->
13    {{ $x := 0 -}}
14    {{ $y := 0 -}}
15    {{ if eq $ovlpos "left-top" -}}
16        {{ $x = $ovlx -}}
17        {{ $y = $ovly -}}
18    {{ else if eq $ovlpos "left-bottom" -}}
19        {{ $x = $ovlx -}}
20        {{ $y = sub .Height (add $overlay.Height $ovly) -}}
21    {{ else if eq $ovlpos "right-top" -}}
22        {{ $x = sub .Width (add $overlay.Width $ovlx) -}}
23        {{ $y = $ovly -}}
24    {{ else if eq $ovlpos "right-bottom" -}}
25        {{ $x = sub .Width (add $overlay.Width $ovlx) -}}
26        {{ $y = sub .Height (add $overlay.Height $ovly) -}}
27    {{ else if eq $ovlpos "center" -}}
28        {{ $x = sub (div .Width 2) (div $overlay.Width 2) -}}
29        {{ $y = sub (div .Height 2) (div $overlay.Height 2) -}}
30    {{ end -}}
31
32    <!-- Add overlay to image, but instead of Hugo creating a name, use the original one + "_o" -->
33    {{ $filename := printf "%s/%s%s%s" (path.Dir .RelPermalink) (path.BaseName .RelPermalink) "_o" (path.Ext .RelPermalink) -}}
34    {{ $imageResult = .Filter (images.Overlay $overlay $x $y) | resources.Copy $filename -}}
35{{ end -}}
When an overlay image has been defined and the ovlperc is defined and not equal to 0, a scaling of the overlay image will take place. If for example the percentage is 10, the overlay image will be resized to 10 percent of the image size to which it is to be added. This happens in lines 6-9.
In lines 13-30 the position of the overlay image is determined. When adding the overlay image.
The actual operation of adding the overlay image is done in lines 33 and 34.
Showing the image
Then the images are to be displayed.
1<div class="col gallery-pad-{{ $gap -}}">
2 <div class="card {{ if $zoom }}card-zoom{{ end }} border-0">
3 <div class="card-img-wrap {{ $ratioClass -}}">
4
5<!-- Determine the class to use for the image -->
6{{- $radiusClass := "" -}}
7{{- if $radius -}}
8 {{- $radiusClass = printf "image-radius-%d" $cols -}}
9{{- end -}}
10
11<!-- Add camera to credits -->
12{{- if $credits -}}
13 {{ $credits = printf "%s %s" (i18n "photoBy") $credits }}
14{{- end -}}
15<!-- Place credits in brackets if there is both a caption and a credit -->
16{{- $break := "" -}}
17{{- if and $caption $credits -}}
18 {{- $credits = printf " (%s)" $credits -}}
19{{- end -}}
20
21<!-- Output thumbnail with image link -->
22<a href="{{ $imageResult.Permalink -}}" data-lightbox="{{- $boxName -}}" data-title="{{ $caption | safeHTML }}{{ $credits | safeHTML }}">
23 <img class ="{{- if $classGrid -}}img-fluid {{ end }}{{ $radiusClass }} {{ $classUserImg -}}" src="{{ $resized.Permalink -}}" alt="{{- $caption -}}"/>
24</a>
25
26<!-- Classes end -->
27 </div>
28 </div>
29</div>Line 1 defines the vertical gap between the images. Line 2 defines if the image will be zoomed when hovering over it and line 3 defines the ratio in which the image will be displayed. In line 8, if the radius has been enabled, the radius of the corners is determined.
Lines 12-19 constructs the credits and caption strings, which is displayed in lightbox.
Finally, line 22 builds the link that will open lightbox when the thumbnail is clicked, and line 23 shows the thumbnail. In these two lines the following elements are relevant:
$imageResultis the image to display in lightbox (optionally with overlay image).- All images with the same
data-lightbox, will belong together and can be navigated to from within Lightbox. - The text in
data-titlewill be displayed below the image in lightbox. classis the set of classes that are assigned to the thumbnail. If a grid is being used, the image is made fluid. Additionally the corners of the class are set and the string from theclassparameter is added.
Making the container
The container that contains all the thumbnails is defined by a set of classes, which are different, depending on whether a grid is displayed or a masonry.
 1<!-- Output opening gallery divs for grid -->
 2{{- if $classGrid -}}
 3<div class="container-fluid">
 4    <div class="container-xxl flex-fill p-0">
 5            <div class="row grid-gap-{{ $gap }} {{ $colCard -}}">
 6{{- end -}}
 7
 8<!-- Output opening gallery divs for masonry -->
 9{{- if $classMasonry -}}
10<div class="masonry-container">
11    <div class="col-md-12">
12        <div class="masonry-{{- $cols }} masonry-gap-{{ $gap -}}">
13{{- end -}}
For a grid, a fluid container is used, which will result in changing the image sizes and the number of columns when displayed on a smaller device. Furthermore, also the horizontal space between the images is specified. The number of columns has been calculated before and stored in $colCard.
For a masonry, a masonry container is used. the number of columns is defined and also the horizontal space between the images is set.
Note that a grid will use primarily bootstrap classes, whereas a masonry will use a mixture of bootstrap and self defined classes.
Wrap-up
The mgallery shortcode provides the functionality that is needed for this site and it is also made for that reason. It should also be useable on any Hugo site that is based on the Hinode template and with some adaptions with respect to loading the Lightbox code on any other Hugo site, as long as Bootstrap is used.